Line Fill tab of the Object Format dialog box
You can leave the Object Format dialog box open while you select and edit objects in your drawing.
Lock/Unlock Fill Display
Clicking the Lock/Unlock Fill Display button alternately locks and unlocks the tab.
 Indicates the tab is unlocked. When unlocked, the tab changes to the settings of the objects you select.
 Indicates the tab is locked. When locked, the settings on the tab do not change when you select objects.
Solid Line Fill

This panel lets you fill the line of a selected object or group of objects with a solid color.
| You can apply the color to the selected object either by clicking the color and then clicking Apply or by double-clicking the color. |
|
Palette list box
|
Lets you select a standard or custom color palette.
|
|
Palette Options

|
Opens a menu that lets you manage Designer's colors and
palettes.
|
|
Color Palette
|
Shows the colors available in the current color palette.
|
|
Color Mixer

|
Opens the Color Mixer dialog box. You can use the four
color swatches on the four corners of the Mixing Palette to
create colors for a custom palette.
|
|
Edit Color

|
Opens the Color Picker dialog box. The dialog box lets you
choose a color from the full range of possible colors and add
it to the color palette.
|
Gradient Line Fill

This panel lets you fill the line of a selected object or group of objects with a color gradient.
Click the left mouse button on a color to make it the starting color for the gradient. Click the right mouse button on a color to make it the ending color.
You can also have multicolor gradients by adding points to the gradient distribution bar and selecting colors for them.
|
Palette list box
|
Lets you select a standard or custom color palette.
|
|
Palette Options
|
Opens a menu that lets you manage Designer's colors and
palettes.
|
|
Color Palette
|
Shows the colors available in the current color palette.
|
|
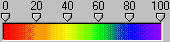
Gradient distribution
|
The gradient distribution bar lets you change the distribution
of the gradient.
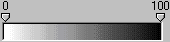
To add a pointer, click in the bar or just above it. To move a
pointer (other than 0 or 100), drag it along the bar. To change
the color for a pointer, click it, then click a color in the color
palette. To delete a point, click it then press DELETE.
This example shows a multicolor gradient:
|
|
Gradient shape
|
Click one of these buttons to select a shape for the gradient:
 Linear
 Radial
 Square
 Conical
|
|
Preview area
|
Shows a sample of the shape, distribution, and angle of the
gradient you have chosen, and lets you drag handles to adjust
the origin and angle of the gradient.
|
|
Origin
|
Type a value for the starting point of the gradient. If you prefer,
you can drag the solid square handle in the preview area.
|
|
Angle
|
Type an angle for the gradient. If you prefer, you can drag the
solid circular handles in the preview area.
|
Hatch Line Fill

This panel lets you fill the line of a selected object or group of objects with a two-color hatch pattern.
You choose the hatch pattern from the gallery of predefined patterns. You can change the foreground and background color, and you can vary the line thickness and spacing in the pattern.
| To apply the hatch pattern to the selected object, click Apply or double-click the pattern. |
|
Hatch Pattern
area
|
Displays the hatch patterns available in Designer.
|
|
Thickness
|
Lets you change the line thickness of hatch fills. The default
value is 100%. Changing this value to 200% makes the lines
twice as heavy; setting it to 50% makes the lines half as
heavy.
|
|
Spacing
|
Lets you change the spacing between hatch lines. The default
value is 100% (no change). Setting this value to 200% doubles
the space between lines; setting it to 50% cuts the space
in half.
|
|
Foreground
|
Lets you set the hatch pattern color. Click the Foreground
button, then click a color in the color palette.
|
|
Background
|
Lets you set the color behind the hatch pattern. Click the
Background button, then click a color in the color palette.
The background color is transparent by default.
|
|
Palette Options
|
Opens a menu that lets you manage Designer's colors and
palettes.
|
|
Color Mixer
|
Opens the Color Mixer dialog box. You can use the four
color swatches on the four corners of the Mixing Palette to
create colors for a custom palette.
|
|
Edit Color
|
Opens the Color Picker dialog box. The dialog box lets you
choose a color from the full range of possible colors and add
it to the color palette.
|
Image Line Fill

This panel lets you fill the line of a selected object or group of objects with a two-color or multicolor bitmap image.
You can either choose the image from the gallery of predefined images or create your own fill images using the Clipboard. For two-color images, you can change the foreground and background color.
| To apply the image fill to the selected object, click Apply or double-click the pattern. |
|
Image pattern
category list
|
Lets you select a category of images.
|
|
Category Options

|
Lets you create, import, rename, or remove categories.
|
|
Image pattern list
|
Displays the image patterns available for the selected category.
|
|
Paste
|
Puts an image pattern in the preview box (to the left of the
Add and Replace buttons) using an object that you have created
and copied to the Clipboard.
|
|
Remove
|
Removes a selected pattern from the image pattern list. You
can only remove the image patterns that you create.
|
|
Scale %
|
The default value for image scale is 100%. Setting this value
to 200% makes the image twice as large; setting it to 50%
makes the image half as large.
|
|
Add
|
Adds the pasted image pattern to the current category.
|
|
Replace
|
Replaces the selected image pattern with the pasted image
pattern.
|
Object Line Fill panel

This panel lets you fill the line of a selected object or group of objects with another object. You can fill with a single instance of the fill object or with repeating rows and columns of the fill object.
You can either choose the fill object from the gallery of predefined objects or create your own fill objects using the Clipboard. For two-color fill objects, you can change the foreground and background color.
| To apply the object fill to the selected object, click Apply or double-click the fill object. |
|
Object pattern
category list
|
Lets you select a category of objects.
|
|
Category Options
|
Lets you create, import, rename, or remove categories.
|
|
Object pattern
list
|
Displays the object patterns available for the selected category.
|
|
Paste
|
Puts an object pattern in the preview box (to the left of the
Edit, Add, and Replace buttons) using an object that you
have created and copied to the Clipboard.
|
|
Remove
|
Removes a selected pattern from the object pattern list. You
can only remove the patterns that you create.
|
|
Edit
|
Opens the Edit Object Fill dialog box for editing the selected
object pattern.
|
|
Add
|
Adds the pasted object pattern to the current category.
|
|
Replace
|
Replaces the selected object pattern with the pasted object
pattern.
|
Remove Line

This panel lets you remove the line of a selected object or group of objects. The line becomes invisible.
| To see the outline of an object that has invisible fill for both its line and its interior, point to Preview on the View menu, and click Wireframe. |
Fill Before/After
This option lets you choose whether an object is filled before or after its lines are drawn.
 Fill an object before its lines are drawn.
 Fill an object after its lines are drawn.
Transform Fill with Object
This option lets you choose whether transforming (resizing, rotating, skewing, or flipping) an object also transforms its fill. For example, with fill transform turned on, resizing an object with an image fill resizes the image fill; with fill transform turned off, resizing the object does not resize the image fill.
 Sets the fill to not transform when you transform the object.
 Sets the fill to transform when you transform the object.
Overprint Stroke
This option lets you turn overprinting on or off for an object's lines.
 Turns line overprinting off.
 Turns line overprinting on.
Preview Button
The Preview button lets you see the effect of any changes on a selected object. (This button has no effect if no object is selected.) You may have to move the dialog box to see the selection.
Apply and Close Buttons
The Object Format box stays open to let you apply changes to objects without having to open the dialog box repeatedly. Click Apply each time you want to apply a change to a selected object. The dialog box does not close until you click Close.
Rolling up the Dialog Box
By rolling up the Object Format dialog box, you can keep it accessible, but out of your way. Click  on the title bar to roll up the dialog box. Click
  to unroll it.